Sunday, May 27, 2012

Eight week technology project

Hi every one:

I and buddhika manufactured Board A auto switch high low beam and the Board B.

so the next steps:
(1) Redesign the circuit.

(2) Zipping the board A and board B together.

(3) welding the parts on the board

(4) Testing on the lab

To archieve this:

Our tutor Vijay gave some suggestions to us.


We need download the software multisim, designing on the computer.


Week seven technology project

Hi every one!


I and buddhika found the problem: the relay and bulb. we used a relay and small transistor BC 547, the circuit is working, that is good:

(1) To control the 12V21W bulb is better using the relay (four pins)

(2) We can still using the transistor, the BC 547 is used for the control the relay coils.

(3) The BC 547  base pin received the signal from the 555 ciruit, ( digital type ).

(4) The emitter connects to the ground.

(5) The collector connects to the coil.

(6) The coil first connects to the power supply, let current flow through the coil and then go to the collector.

(7) relay 30 connect to the power, and 87 connect to the bulb.

we made a mistake on the the transistor pins, and we mixture the emitter to the collector. so the circuit is not working, unless the relay is dida----dida, and increasing the voltage to 10.5 volt, the bulb turned on. later we diaganostic the problem, the transistor pin is a problem.


Week six technology project

Hi every one:


I and buddhika found the circuit problem was on the part (transistor and bulb).


The design using the transistor to be switch for the bulb is quite hard, because the high current and voltage, later we talked with the tutor about it. we can us a relay to control for the bulb, and the a small relay for the switch for the relay.


That is a new design, but we need to do it by the test.

Week five for the technology project

Hi every one

I and buddhika will do a circuit for the intellegent head light, it has two function:

One is for the auto switch the high beam to low beam.

Two is for the fog light flash to warn the the facing vehicle which is turning on the high beam.

The circuit on the function two is not working:

I and buddhika tried to find one way to test, we thought the oscilloscope maybe can do the job:


The 555 circuit is working, now only the transistor and the bulb ciruit is the problem.


Saturday, May 26, 2012

Hi everyone:

I and buddika made a ciruit for the fog light flash: we tried typeA and TypeB:
Type A:


Type B:
The type A is not working and the type B is still not work, so we tried to find where is the problem. we did not have too many time, so we focus on the type B, because we thought the type B is more suitable for the circuit.

The type B include two parts:

One the signal send:

One is the transistor and bulb:


we test the transistor and bulb, not working. and we thought how to test the signal 555.


Monday, May 21, 2012

Week Four Technology Project

Hi every one:


I and buddihka booked a time and talked with the Vijay.

After we told the tutor Vijay, Vijay gave us some idea:


(1) using the multimeter to record the value of the voltage and current in each point, especially on the changing on the high beam and low beam.

(2) On the test I only use one bulb to check, on the vehilce the high/low beam is one pair.

(3) Preparing for the fog flash on the board, when you saw the high beam the fog need flash.

(4) The two bulb will be pallarel.

(5) record all the parts price, and calculate the labour fee for making a circuit and fixing on the vehilce.

(6) Making your own logo and putting all the part in the box.

We found a flash circut:

We will study this circuit and put the components on the board.
Hi everyone ! I and buddihka found all the parts and starts to put all the parts on the board.


There is a problem about the relay: if the relay is five pin. then which pin is which. 30,85,86,87,87A we looked the website: 85 and 86 is for the coil. 30 is for the positive 12V in 87A and 87 one is for the low beam, one is for the high beam.

Relay Diagram Bottom View after all the parts put on the board and connect to the power supplier and the relay. it's working. We use brake/park light for the low/high beam. using the hand block the LDR the relay switched the low beam to the high beam. removed the hand, the light switch from the high beam to the low beam.


The diagram on the website is right. we will talk with our tutor Vijay


Week three for the Technology Project.
Hi everyone ! I and buddihka found all the parts and starts to put all the parts on the board. There is a problem about the relay: if the relay is five pin. then which pin is which. 30,85,86,87,87A we looked the website: 85 and 86 is for the coil. 30 is for the positive 12V in 87A and 87 one is for the low beam, one is for the high beam. Relay Diagram Bottom View after all the parts put on the board and connect to the power supplier and the relay. it's working. We use brake/park light for the low/high beam. using the hand block the LDR the relay switched the low beam to the high beam. removed the hand, the light switch from the high beam to the low beam. The diagram on the website is right. Week three for the Technology Project.

Sunday, May 20, 2012

Hi everyone:

I and buddhika has a project for the auo dimmer light and warning system.

we found the a small circuit on the website, it's auto dimmer light circuit, our project is different to that, but we would like to know the theroy and then make our one.

That circuit showing at the first week:

But we did not know the circuit is working or not, so we just is trying to make one for the test.

The componet for the circuit:

R1 = 1K,
P1 = 10 K,
LDR = ( We bought the LDR in the Jaycar )
T1 = BC547,
D1 = 1N4007
Relay = coil 400 Ohms, DPDT, 12 volts


LDR in that circuit is 10-50K

we can not find the exactly same one:

Light Dependent Resistor (LDR) - 8.5 x 10.1mm CAT. NO. RD3485
Dark resistance: 0.5M ohm min.
Light resistance: 2.8K ohm min 8.4K ohm max.

The Jaycar supply another kind of the LDR: light resistance is 48K to 180K.

so we use the RD 3485:

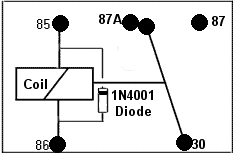
One of thing confuse us is the relay:


From the diagram we can they use the Eight pin relay, six for the two lights high beam and low beam switch, we though just using a five pin relay to be a test.

We thought we can the two lights parallel together, and use one brake/park light to be the high beam and low beam.

High beam:  brake light

Low beam:  park light

The week two for the technology Project.


Hi every one:


I and buddhika found some informations about the Auto dimmer headlight circuit

This is a simple circuit, using a LDR to be a sensor, LDR light dependent resistance,
This type resistance has such function:

When in the dark the resistance is increasing.

When under the light the resistance is reducing.

The LDR is used  together with the transistor, and the LDR is connect to the base, the LDR is sensor to send the current to the transistor, and let the transistor to be a switch,
When in the circuit the senor and transistor is used for the switch to control the electrical unit liking the bulb, they uses the relay to be a control.

Light changing----LDR----current----transistor base----transistor on----relay switch----bulb high beam and low beam switch.


The diode I think is a protection for the relay coil.

That is our understanding for this circuit.

Week one for the blogger Technology Projector